For the mini retreat assemblage project I chose to repeat a Stampaway class using Tim's die cut houses of chipboard and my specimen boxes. They're covered with a sampling of the papers created during our first project.
These first 2 photos are of Lynda's assemblage project showing the houses in process and then the completed piece. The first house on the left has a pleated roof made of tape measures and the dimension in person is fabulous. The roof of the third house is metal flashing tape run through a texture plate and the 4th is actually done with rows of paint from a Viva Pearl Pen. And I don't know if you can see it, but look closely at the third house. The door is actually hinged and she has a clip art lady standing just behind it as though she's stepping out. Very clever.
These houses in progress belong to Laurie and the background below was taken at the same time as the houses. Check out the house on the right; that background shows off a stamped image made with the Clearsnap Magic Stamp on the right and tiny polka dots on the left created with drywall tape. The second house from the right also showcases that Penscore stamping with a stencilled flower near the roofline.
I thought this background paper was fabulous so imagine my surprise when I took the photo below of her finished piece.
Look how the colors changed. She decided it needed more contrast so she darkened it with blues. Simply amazing. And if you look closely you'll see a rub-on alphabet letter on each house which denotes each member of her family. And the token on the roof of the second house from the left has a W, which is the initial of their last name. Way cool baby. We were digging through my many stashes, looking for an embellishment for that roof and it was perfect. Kismet!
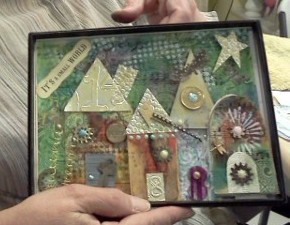
Now here are 2 shots of Bonnie's finished assemblage. Notice the metals she used and you'll see how someone who loves to create jewelry using metal objects can incorporate that same talent into other projects. She's got flashing tape rooftops on the 2 houses on the left, but lots of metal elements are on all four.
But look more closely. On her background she'd used punchinella of stars to create what looked to me like smoke from a chimney. And sure enough, the next time I looked, she'd added a chimney to the house. But the biggest hit of all are the 2 wire trees on the left. When she worked on the layout she was unhappy with the empty space and said it needed trees. So I suggested wire, and before you could blink she'd created those two coiled trees. Talk about the perfect finished result! And check out the 8 on the door. Wonder if she likes 8's as much as I like 4's?
The photo above is Moneta's houses in progress. I wanted you to see the 2 pieces of eco board she used as a door and a window, inked and stamped.
Here's here finished piece above. The paper on the largest house was a page torn from a textbook on how to build your own home. I found it at the library book sale and knew I could tear out pages to use in art, and sure enough, these little die cut houses screamed for just this touch. Can you see the stamped spiral near the top? It was created with the plastic canvas circles I provided to be used as stamps. Works everytime.
The photo above is Carol's completed assemblage and I wish I'd taken more photos of her houses in progress because her layering process was wonderful. On the first house on the left she added a clip art postage stamp, then on top she layered a small square of masonite from Coffee Break that she'd collaged, and then she added a key from an adding machine I'd disassembled years ago. Made the perfect doorknob.
The third house from the left is my favorite and not just because I watched the transformation so closely, but because it was truly unique. I'd given everyone collage sheets I'd purchased from Teesha Moore so they could accent some of the pages of their books. But Carol focused on one of those images early on in the assemblage project because the shape of the doodling matched the shape of the house. If you look closely you'll see she added perfect little pearls with a Viva Pearl Pen, but then in true Teesha fashion she added the striped accents in black with a pen. That's a button in the center of the house but she inked a red bingo marker to add that black element of N39 on top of the button. And yes, that's some of Tim's tissue tape across the bottom that reads Pasadena. Another favorite element of mine: check out the Blue Goose cigar band from Coffee Break that adorns the roofline of the house on the right as well as the metal token atop another piece of ecoboard. These girls were so intense while they worked on these projects but the end results showcase their many talents.

Now for the last 2 photos which are Sharon's project, both before and after. First she chose one of her background pieces which was antique sheet music inked and stamped with the Clearsnap Magic Stamp. It was and still is beautiful, and in a color palette she doesn't normally use. In the above photo you'll see the 2 houses in the middle that showcase her usual palette which includes Ranger's Adirondack Stream and Lettuce with a hint of Wild Plum and Red Pepper.
Now look at the finished project. Everyone was given a piece of glossy black cardstock and she chose to use that as her background instead of her sheet music. I've got to admit, I'd never have considered it, but wow, it's perfect!
So now let's talk about details. Check out the roof on the 2nd house from the left. Again, she used a Viva Pearl Pen to create all those polka dots of dimension. She's got one of those adding machine keys as her doorknob, and the base of the house is a piece of the aluminum flashing tape run through a texture plate and colored with Viva's Inka Gold. The little glass marbles along the roofline were a nice touch for added dimension.
The little house with the rounded rooftop needed an accent so we dug around in my stash and found the little string of jewels.
These photos can't begin to showcase the fun, creativity, talent and whimsy we experienced during the retreat. But I'll tell you that the best thing about a retreat in my studio is being able to dig into drawers and bins for that perfect element, and that's something I can't replicate in a class, no matter how many boxes of supplies I ship. Everyone will tell you that their kits at conventions are generous, but until I figure out how to include these little surprises, it's never going to be the same.
A heartfelt thank you to all the ladies who came to play, and to Carol and Moneta who were here from Illinois, because it was their persistence that convinced me to play hostess for a day of play.
I'm already trying to come up with a date for the next one, so no matter where you live, make sure you contact me if you're interested.
And thank you all for coming back to take a look at the photos of the finished pieces. Aren't you glad you did?